
|
Patrick AMAR
Bioinfo group, LISN, Univ. Paris Saclay, UMR 9015 CNRS
Synthetic & Systems Biology group, Sys2diag UMR 9005 CNRS, ALCEDIAG
| History |
FLWiX is a keyboard (and to a lesser extent a mouse) oriented text editor. It works the same way under the three main operating systems: Linux, Mac OS X and Windows.
FLWiX the successor of the Unix / X Window System text editor WiX, it uses the FLTK graphical interface toolkit and is written in C++ (the original WiX text editor was written in C).
| Download FLWiX |
|
|
|
|
|
|
|
|
Download dictionaries:
| FLWiX Documentation and settings |
1. Overview
1.0. Quick start
To launch FLWiX from the command line, the easiest way is to type "flwx
file-to-edit" (without the quotes). This will run the flwx
daemon in the background, and open a window containing "file-to-edit".
If no file to edit is provided (or if it does not exist) an empty window will be opened.
From any FLWiX window, this on-line documentation can be displayed by typing esc-esc (hit the Escape key twice)
1.1. Anatomy of the editing window

On the bottom left side of the window, 6 icons show the current state
of the editing window.
They can be used to alternate respectively
between:
 (unmodified) or
  (modified) buffer or
  (read-only) buffer
 (ISOlatin1) or
  (Unicode) or
  (ASCII) character encoding
 (Unix) or
  (Windows/DOS)
line transition convention
(Windows/DOS)
line transition convention
 (Auto wrap mode) automatic folding of the lines
longer than the window width, or
(Auto wrap mode) automatic folding of the lines
longer than the window width, or (Long line
mode) no line folding
(Long line
mode) no line folding
 without spell check or
 with spell checking using the main language
(French for example) or
with spell checking using the main language
(French for example) or using the
alternate language (English for example).
using the
alternate language (English for example).
Dictionaries for six languages are provided with the FLWiX
package:
English ,
French ,
German  ,
Italian
,
Italian  ,
Portugese
,
Portugese  and
Spanish
and
Spanish  .
.
 insertion mode (default) or
  replacement mode.
 standard plain file (default),
 gzip compressed file,
  AES/DES encrypted file,
  compressed and AES/DES encrypted file.
On the bottom right side of the window the name of the current editing mode is displayed. A left mouse button click pops the list of all the editing modes allowing the user to switch to another one. A right mouse button click pops the current mode wall-chart, the list of all the commands and their bindings in the current mode.
On the right side of the window, a scroll lift is permanently displayed (or automatically displayed, when the mouse pointer goes near the right side of the window). The size of the lift represents the visible part of the buffer, while its position represents the location of the window in the buffer. Configuration options control how the scroll lift is displayed and what colours are used.
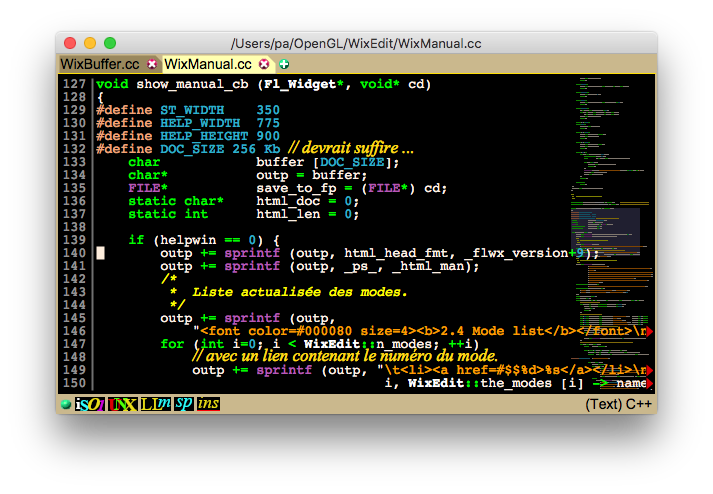
The text editing cursor is displayed as a steady block containing the current character in reverse video. Standard characters are self-inserting in the buffer while the editing commands are called using combinations of special keys (Escape and Control mainly) or dedicated keys (arrows, PgUp, PgDown, ...).
Any portion of the edited text can be selected using mouse or keyboard
commands. The selection is shown inside a polygon made of up to three
rectangles. The selection background and border colours are controlled by
configuration options.
The selected text is stored into the PRIMARY_SELECTION (X
cut buffer) on Linux and into the clipboard on MacOS X and Windows.
In the next sections of this manual command Keys will be used from time to time to show examples of commands. A key is a combination of one or more keyboard key, with or without modifiers (Shift or Ctrl). The syntax used to write a key is the same as used in the keytable: mode configuration switch:
The user configuration file, ~/.flwxrc, located in the user home directory, is automatically created the first time FLWiX is launched. This default configuration file sets the main, alternate and personal dictionaries to the names:
                ~/.fr_dict.gz,
                ~/.en_dict.gz,
                ~/.user_dict
respectively.
Any of the six provided dictionaries can be used for the main and alternate languages. These dictionaries can be gzipped (the default for languages) or not (the default for the personal dictionary).
The Configuration file chapter shows how it can be modified to fit the user preferences.
1.4. Command line options
flwx can be started in server mode or in client mode. Each mode has
its own options, but silently ignore those of the other mode.
When launched, flwx detects if there is a server
instance of itself currently running. If not, flwx run as a server
program that makes the editing windows communicate (via clipboard,
kill-stack, ...); It cannot be launched in server mode more than once per user
(unless with the
-debug option).
Otherwise, when a server instance is already running,
flwx run in
client mode and asks the server to edit files.
Synopsis: flwx [options] [file-1 ...
file-N]
Regardless the mode, the file-1 ... file-N files (they must appear after the
last option) are loaded as tabs in one window.
Shared options
When no position is given, and if there is no <previous
position associated to the edited files, if the near_pointer is set, the new window is placed near
the mouse pointer, otherwise it is the system window manager
that sets the window location
1.5. Mouse usage and dialog boxes
Although a text editor, and especially FLWiX, is a keyboard oriented software,
many commands can also be triggered using the mouse. Even when it is obviously
easier with the mouse, everything can be done using the keyboard only!
If the icon is dragged outside the window, its background colour
is changed to light blue if it is on the root window (or any other
application window) or is changed to light yellow on any flwx
window. When dropped on a flwx window the tab is moved to this
window, otherwise it is moved to a newly created window.
The current tab, even when it is the only one in the window, can
be dragged the same way with a left-drag along with the modifiers
specified by the drag_tab_modifiers parameter.
The follow_mouse configuration switch controls
wether or not the text cursor follows the movements of the mouse
pointer.
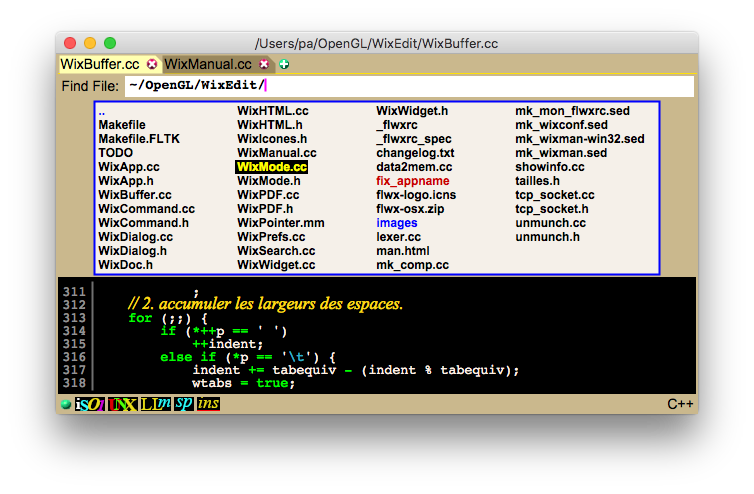
In addition, for the file selector, the slash (and back-slash in
Windows) and the tabulation characters open the directory named by the
prefix (if it is a directory and if it is readable of course). When
the file selector is used to create or overwrite a file, the automatic
confirmation is disabled, only the Return key validates the dialog. In
the file list, the directories are written in blue, the executable
files in red and the other file types in black.
Of course, the native file selector (the standard one of the
operating system) can be used instead of the built-in one. The user
can choose which one with the configuration flag use_native_fsel.
There are two lists that does not have a text field associated: the special characters list and the emoji list. The only way to select something in
these lists is to left-click on it.
At startup, the flwx server try to load the user configuration file
~/.flwrc; If it cannot be found, a default one is written (if the
access rights are granted). This file contains two classes of specifications:
The global form of the startup file is something like this:
So we can for example put the global parameter block 2 and mode 1
definition into the file ~/.mode_1 and the configuration file
become:
The predefined variables the boolean expressions operate on are:
The formal grammar of the configuration language is:
To ease the modifications of the default parameters, this
help window displays both the documentation and the parameter settings for
FLWiX: the dark red links
are setting links that allow the user to pop up a dialog box in order
to set or change the value of the associated parameter, modifying directly the
configuration file.
The mode parameter preference links first pop a menu
containing the name of the modes associated with the link parameter, and then the
change value dialog box. This allows the user to specify for which mode the
new value is to be set or changed.
For almost all the parameters, the new values are immediately taken into
account. Only a few need a restart of the FLWiX server, using for instance,
the restart-the-editor command, or by quitting
it and then relaunch it. They are:
A style is defined by a colour, a type of line and its thickness;
The syntax is:
Whatever its value is, when a delimiter is inserted, the word is
always strictly checked.
defines the umask associated to a directory. The syntax is a
string containing a list of colon (:) separated directories where
saved files will have their access rights set according to the mask
specified by the octal number between parenthesis immediately
following the directory name.
when a window is closed, FLWiX saves data about the file being edited
along with the position and size of the window in a hidden file named
"._flwx_file_info" located in the user's home directory. The
info_path parameter is a string containing a list of colon
(:) separated directories where edited files will see their
informations retained for a number of days specified by the number
between parenthesis immediately following the directory name.
The algorithm used to determine the editing mode for a file works like this:
There are two ways to specify what style is associated to a
portion of text:
FLWiX handles up to 30 user-defined styles and up to 128
additional alias names for these plain styles. There is only one
built-in style, the StandardStyle, where the associated
colour is the global parameter foreground and the
associated font is the textfont
mode parameter (see below).
The name of a plain style (or an alias style) must be made of
letters, ending with the word "Style". Each style defines 4
associated configuration switches constructed with a prefix,
followed for 3 of them by "_colour", "_font", and "_submode".
The regular expressions used in this context are restricted to
intervals "[...]" including the negation "[^...]", the beginning "^"
and end "$" of line, the "+" for one or more and "*" for zero or more
occurrences of the previous character. The pattern matched is the
shortest, rather than the longest as in standard regular expressions.
To avoid repetitions, or errors using cut
& paste, in programming language modes that share keywords, such
as C, C++, CUDA and JAVA for instance, global variables can be used to
store keyword - style associations. For example, the
c-keywords defined by:
To help the definition of the FLWX mode, used to edit the
configuration file, some specific built-in names refer to
internal lists. They are used to assign a style to a group of
names. For example, to assign the CommandStyle to all
the command names, this line can be used in the
keywords value:
This restricted regular expression describes the syntax of the
file inclusion directive used in this mode. As in the magic mode parameter, multiple regular expressions
can be searched, each one separated by the character
| (vertical bar).
associates the name "font name" to the "user_font_1" font descriptor.
The default value refers to the fixed spaced FLTK standard font
(Courier) which can be system specific. For example:
adds a positive or negative vertical offset to the corresponding user
font. Using the previous example:
Fundamental
Diff
C
C++
For each command, its name is first displayed, then the list of the keys bound to it in the Fundamental mode, then, if this command is not bound in the Fundamental mode, the name of the first mode where the command is bound to these keys.
3.1 Moves
when a single quote is typed after the letter "e", it is replaced by the accented letter "é", and if a second quote is typed, the "é" is replaced back by "e". This is useful for typing accented letters with a standard UK or US keyboard.
when a single quote is typed after "touche", it is replaced by "touché" or if the quote is typed after "ete", it is replaced by "été".
The editing mode corresponding to the type of the file is set, along with the appropriate language, depending on the "infer_language" flag.The crypted / compressed icon shown on the status bar displays The /old/new/ syntax can be used to specify the searched and replace strings/regexprs in one prompt line (as in the "sed" command). The slashes (/) can be replaced by vertical bars (|).
If called with the awm argument, when the window is in auto-wrap mode, the command tries to widen the window to show the most of the folded lines.
If the window is already splitted, then the lower pane is removed.
If the files are too different, the good looking algorithm can be slow, mainly because it tries to find possible line insertion or deletion (which is quadratic) for each line and because similar lines are too rare, it never find any... A simple test detects this situation and switch to a very fast algorithm, which mainly indicates that each line is to be replaced. Any command that results in a vertical scroll in a pane also scrolls the other pane to display the same page.
Some options are shared by the server and client modes:
Server mode options
Uses an alternate port number for the connection
between the client and the server. This is mainly used for debug
purposes.
Open the diff window to
display and edit the differences between "file_1" and "file_2".
displays on stdout the global options
values after loading the configuration file, then exits.
update the files of the project to
version v or to the last version if not specified. The update is made
from the local repository (whether it is the reference
repository or not). Does not launch the editor.
filename is
the name of any file belonging to the project. If it is not an
absolute pathname, it is assumed to be relative to the current
directory.
sets the window size to the specified number on columns and lines, and
put the window at screen coordinates (xpos, ypos). Negative xpos or
ypos means xpos (resp. ypos) pixels from the right (resp. bottom) side
of the screen
Searches for the "string" in the editing
buffer and set the cursor at the end of the string when found.
displays on stdout the name and the value of all
the variables, then exits. Here is an example of the output:
            FLWiX Version: 2511.13

            OS = Linux
            OSTYPE = Linux
            SYSTEM = Linux
            USER = pa
            LOGIN = pa
            USERNAME = pa
            CHARSET = ISO-8859-1
            KBD_LAYOUT = us
            LANG = en
            ROOT = false
            ADMIN = false
            HOSTNAME = orion.lisn.fr
            ALT_DISPLAY = false
            SCREEN_RESOLUTION = 103
            SCREEN_COUNT = 1
            SCREEN_WIDTH_IN = 37
            SCREEN_HEIGHT_IN = 21
            SCREEN_WIDTH = 3840
            SCREEN_HEIGHT = 2160
displays the list of the previously edited files
along with the time elapsed since each file has been edited (-I
reverses the order). This is related to the info_path global parameter.
loads each file into a tab of the window, then waits until this
window is closed, i.e. when all the tabs are closed, or the window is
explicitly closed using the close button of window top banner. This is
used to hide the client-server implementation to some applications
that allow the user to use an external text editor.
Client mode options
Starts flwx in server mode explicitly.
the command waits until the server terminate.
This is mainly used for debug purposes.
does not show the splash screen
does not reopen the windows opened in the last
session
uses the built-in configuration (does
not try to load the ~/.flwxrc file). This useful
when there is some error in the ~/.flwxrc file that prevents the
server to run...
set the ALT_DISPLAY variable to
true. This is useful to select one colour set for a screen
display and another one for a video projector.
does not display the window creation icon
(see also the boolean configuration switch show_launch_icon)
set the default font size used in the windows
(see the Font sizes parameters).
force the created window to use the Fundamental mode
regardless the type of the loaded files. This behaviour remains even
when some other file is loaded, unless the toggle-auto-mode command is used.
terminate the flwx instance currently
running as server, and then exits itself.
2. The configuration file
A left-click on the mouse places the
text cursor on the character under the mouse pointer. When the mouse
pointer is on the line numbers, the cursor is moved to the beginning
of the line.
If a text was previously selected, (highlighted) it is then
redisplayed on the standard background colour (non highlighted).
When the button is released, the text cursor is placed at the end
of the selection (near the mouse pointer) and the selection is
committed (i.e.: the selected text is transferred to the
clipboard (and also to the X-Windows cut-buffer on
Linux). It can be pasted in FLWiX and other applications.
On Mac OS X and Windows, a middle-click
inserts the content of the clipboard where the text cursor is.
On Linux, the cut buffer is inserted. To insert the content
of the clipboard use Shift-middle-click.
Just after a selection is made, the selected text can be cut
using the BackSpace or Delete key.
When a portion of text is already selected (therefore
highlighted) a right-click extends the selection up to the
character under the pointer. If the pointer is before the
selection, the beginning of the selection is moved; Conversely,
if the pointer is after the selection, the end of the selection
is moved.
If the pointer is inside the selection, the
selection remains unchanged.
When there is no selection (no text is highlighted) a right-drag
grabs the text and scrolls it vertically and/or laterally,
in such a way that the mouse pointer remains over the same
character in the buffer.
If the lift_always_visible configuration flag is set
to true, a scroll lift is permanently (or not if set to
false) displayed on the right side of the window. When the
user moves the mouse (without any button pressed) towards the right
side of the window, the lift appears more and more brightly (if
lift_always_visible is false).
When moving the pointer nearer the right side of the window, the
lift colour goes from red (lift_colour) to green (active_lift_colour) indicating that a left button press
will be able to action the lift.
If now the user press the left mouse button the lift colour goes
from green to purple (lift_motion_colour) and a mouse
drag will scroll the text up to the full extent of the buffer.
The mouse wheel (or track pad on laptops) allows the user to scroll
the text vertically (or laterally with the Shift modifier)
slowly or quickly (with the Ctrl modifier). The scroll speed
is controlled by the wheel_acceleration
configuration parameter.
When the mouse wheel stops turning, and after a short delay
(shape_timeout defaults to 800 ms) or immediately after
the mouse button is released when using the scroll lift, the
miniature display disappears.
FLWiX use smart lists to get
names: files, fonts, modes, emoji, special characters, ... These lists
are pulled down from the upper side of the window and use a
modal dialog type (the keyboard and mouse events are redirected
to the list until the dialog is finished). A list is made of two
components, the list itself and a text field that will ultimately
contain the desired name.
If the content of a list is too long, it can be scrolled with the
mouse wheel or with keyboard commands (arrows, PgUp, PgDown, Home,
End, ...) or using the mouse in the lift of the scrollbar displayed on
the right side of the list.
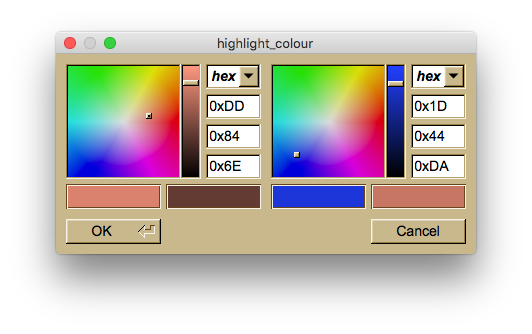
The colour selector is used in the FLWX
mode (the mode used to edit the configuration file) to enter a colour
specification (#rrggbb) as a value for a parameter. The colour
selector can show one or two panels. The left one is for the screen
colour parameter, while the right one is mainly for pdf output
corresponding colour. For the selection and highlight colours, the
right panel selects the border colour.
2.1 Overview
Of course, line comments can be placed anywhere in the file. A line comment is
simply a line that begins with a # (sharp sign).
# first parameter block
To keep things clear and simple, it is possible to include a file
(with the include directive). This directive cannot be used
inside a mode definition, but can be nested (an included file can
include an other one).
global parameter block 1
global parameter block 2
# the famous Mode 1
mode 1 definition
mode 2 definition
global parameter block 3
# Another comment
mode 3 definition
# first parameter block
Conditional expressions on built-in or system specific
variables can be used to parametrise global and mode specifications. Let's see
first the syntax of the if directive, the boolean expressions, and the
variables they can use. The syntax is derived from the C language:
global parameter block 1
# Mode 1 and parameter block 2 are stored in ~/.mode_1
include ~/.mode_1
mode 2 definition
global parameter block 3
# Another comment
mode 3 definition
if (<boolean expression>) {
statement
statement
statement
} else {
statement
statement
}
The if directive can be used at global level, as well as inside the
definition of a mode, but NOT straddling a defmode
directive. The else part can be omitted.
There are also predefined constants:
Of course the if / else directives can be nested.
# --------------------------------------------------
If the if (or else) clause contains only one statement
the curly braces can be omitted:
# On Windows
if (OS == Windows) {
Windows parameter block
# With administrator privileges
if (ADMIN) {
more
parameters when administrator on Windows
}
}
# On Linux or MacOSX
else {
Linux or MacOSX parameter block
}
global parameter block 2
# --------------------------------------------------
if (OS == Windows) switch = value
            FLWXRC  ::= LINST
// statement list
            LINST   ::= INST
                    |   INST LINST
// single statement
            INST    ::= <param> '=' <value>     // outside a mode definition
                    |   <param> ':' <value>     // inside a mode definition
                    |   IF                      // everywhere
                    |   SET                     // outside a mode definition
                    |   DEFMODE                 // outside a mode definition
                    |   DEFCMD                  // outside a mode definition
                    |   INCLUDE                 // outside a mode definition
// variable assignation
            SET     ::= 'set' <name> '=' <value>
// contitional evaluation
            IF      ::= 'if' '(' BOOLEXP ')' BLOCK ELSE
// boolean expression
            BOOLEXP ::= VAR RELOP VAR
                    |   VAR
                    |   '!' BOOLEXP
                    |   '(' BOOLEXP ')'
                    |   BOOLEXP '||' BOOLEXP
                    |   BOOLEXP '&&' BOOLEXP
            RELOP   ::= '==' | '!=' | '<' | '<=' | '>' | '>='
            VAR     ::= <name> | <string> | <integer>
            BLOCK   ::= INST
                    |   '{' LINST '}'
            ELSE    ::= 'else' BLOCK
                    |   ø
// user command definition
            DEFCMD  ::= 'defcmd' <ident> '(' ')' '{' LCOMM '}'
            LCOMM   ::= COMM
                    |   COMM LCOMM
            COMM    ::= <ident> '(' ARG ')' ';'
            ARG     ::= <string> | <integer> | ø
// mode definition
            DEFMODE ::= 'defmode' <ident> INHRT '{' LINST '}'
            INHRT   ::= ':' <ident> | ø
// file inclusion
            INCLUDE ::= 'include' <filename>
The value between square
brackets, just after the parameter name is the FLWiX default value. The second
value is the actual _flwxrc value.
2.3 Global parameters
2.4 Mode specific parameters
The spell checker recognises words that are more or less
misspelled. Correct words are left unchanged and are not
underlined. Depending on the level of misspelling, four underline
styles can be specified.
xxx_colour = #rrggbb [<style> <thickness>]
where #rrggbb is a hex RGB colour specification (#0 meaning
transparent therefore ignored), style and thickness are not
mandatory. The thickness can range from 1 to 15 (default 1) and
the possible types of underlining are:
                solid      ___________ (default)
                dash       _ _ _ _ _ _
                dot        . . . . . .
                dashdot    _ . _ . _ .
                dashdotdot _ . . _ . .
The four detected misspelling kind are reported using the
following underline styles:
The colour and style of underlining for words that are not
recognised at all by the spell checker in either the main or the
alternate languages.
the colour and style of underlining for words that contains
letters poorly accented but where only one valid accentuation exists.
In this case the word will be automatically corrected when a delimiter
(space, punctuation) will be inserted near the word. Typically, when
typing a sentence, the accents will statistically be automatically put
on the right letters.
the colour and style of underlining for words that contains
letters poorly accented and where many valid accentuation exists.
the colour and style of underlining for words that are misspelled
in the main language but correctly spelled in the alternate language.
This allows the user to mix the two languages in a text and still take
advantage of the spell checker.
the fix-spelling command, used to
correct the spelling of a word, displays a menu with alternative
possible spellings. When the word is correctly spelled but variants
exists only because of accented letters, this switch indicates wether
or not only these variants are displayed, or if the full search of
spellings must be performed.
When the auto_spell_check flag is
set, each time a character is inserted (or deleted) a spelling check
is performed. This check can be strict or lenient on accented letters
depending on the value of the strict_accent_check switch.
This switch controls also whether or not an accent mistake
is treated as a full spelling mistake.
controls whether the flwx launcher icon ![]() is displayed or not. On Windows the
launcher is always displayed.
is displayed or not. On Windows the
launcher is always displayed.
sets the size and position of the flwx launcher icon on the
screen. The syntax is WxH+/-X+/-Y. When WxH is omitted, the size
defaults to 32x32.
The default position depends on the plateform: top left on Linux
and MacOS X, bottom right on Windows. The default size depends on the
screen resolution: 32x32 on low resolution, 48x48 on high resolution.
This is overridden by the -g command line option.
show (true) or hide (false) the tab bar when there is only one
tab.
if true, when a parameter value is changed, the configuration file
is shown in a read-only window. The cursor is placed on the line that
defines the modified parameter, with the new value.
if true, only a matching prefix of an alias is
necessary to expand the alias. Otherwise the whole alias must have
been typed to trigger the expansion. This does not apply to aliases
that contain a regular expression.
controls whether the system's standard file selector is used or
the built-in one with the quick flwx shortcuts.
indicates whether the search commands
(^S^S, ^S^R, ^S^F, ...) and replace command
(Esc-) are case sensitive.
indicates whether the standard file selector is case sensitive
when loading a file. If set to false (the default), the
filename expansion occurs regardless the case of the characters typed.
controls wether all the occurrences or only the next pattern
found by a successful search command are highlighted.
specifies the number of lines used for scrolling, and the final
position of the text cursor, when the window is redisplayed after a
command. If set to true, the cursor is placed at the top of
the window (forward scroll) or at the bottom (backward scroll). The
cursor is placed at the median line otherwise (default behaviour).
The immediate consequence is that the document is scrolled by a
full window height (when true) or by a half window height
(when false) when the cursor goes before the first displayed
line or after the last displayed line.
when set to true and when the specified combination of
keyboard modifiers is pressed, the insertion cursor follows the
mouse pointer. The modifiers are set using the follow_mouse_modifiers parameter.
when set to true, selecting text also copy it into the
cut-buffer and the clipboard. Otherwise the selection is not
automatically copied.
when set to true, any command that copy something to the
kill-stack, also copy it to the cut-buffer and the clipboard.
when set to true, allows the edition of the same file
into more than one window or tab. The first occurrence only is in
read/write mode, all the others are in read only mode.
when set to true, the mouse pointer is warped inside the
window created by the flwx command. This window is then
raised and gets the keyboard focus.
when set to true, the window created by the
flwx command is placed near the mouse pointer, on the left
side of the terminal window (unless the location of this window has
been set in a previous editing session). The default value is true on
big screens (width > 3800 pixels) false otherwise.
when set to true, the AES 256 algorithm will be used to
encrypt / decrypt files when reading and writing them when the crypt
option is selected for the window/tab (a lock icon is displayed
on the status line). Otherwise the DES algorithm (less secure
???) is used.
when set to true, the project where each loaded file
belongs is automatically updated. The local repository is synchronised
with the reference repository of the project, and the working files
are updated. If a file is currently loaded when the update occurs, its
up to date version is reloaded. This process is active for all the
files that are loaded when FLWiX is launched and each time the
"load-file" command is invoked.
when set to true, when FLWiX exits, the projects
corresponding to each edited file (that have not been explicitly
committed) are automatically committed to a new version. The local
repository is updated with the new version of the modified files and
the reference repository is synchronised.
Its value describes the host where the reference repository is
located. The syntax is the one used by ssh/scp to identify a
user and an host: user@hostname. Any legal way to can be
used depending on the ~/.ssh/config user file.
There is one
exception, when the reference repository is on the same host as the
local repository. In this case, the master_host value is set to
the base directory containing the repository. If this directory
pathname is not absolute (beginning with a /) then it is assumed to be
relative to the home directory of the user. The "scp_cmd" is to be set
to "cp" instead of "scp".
This is the command used to transfer files between the local and
the reference repositories. If they are located on the same machine,
"cp" is the best (fastest) command to use. Otherwise, "scp", or an
equivalent command is required. To avoid multiple prompts for a
password or a passphrase, it is recommended to use a ssh agent
such as keychain. Thus the value of the "scp_cmd" can be
something like: keychain $HOME/.ssh/id_rsa > /dev/null
2>&1; . $HOME/.keychain/$(HOSTNAME)-sh; /bin/scp -q
The "$(HOSTNAME)" part will be replaced by the hostname of the machine
running FLWiX.
this is the command to use to call a PDF viewer to display the
PDF output of the current buffer. The default value depends on the
operating system:
Preview on MacOSX, Evince on Linux
Acrobat on Windows.
the horizontal and vertical margins (in millimeters) surrounding
a PDF output page.
the size of the font used to convert the buffer to the PDF format.
when set to true, a rectangular frame is drawn around
each page of the PDF output.
when set to true, the page number is drawn in the middle
of bottom of each page of the PDF output.
the size of the newly created editing windows expressed in number
of columns and lines (computed using the default fixed width font: mono). The default values depends on the width of
the screen:
. 24x80 on small screens (width < 3800),
. 30x90 on medium screens (3800 ≤ width ≤ 5000),
. 40x95 on large screens (width > 5000).
the alternate size of an editing windows expressed in number of
columns and lines. The toggle-zoom-window
command switches between the default size and the alternate size.
Offsets used to place the windows exactly at the same position
than those from the previous session. This is because the
window-manager adds decorations that can mess the placement.
the offset (number of columns) added to the window size computed
by the adjust-window-size command.
the size of the font of the text. The default value depends on
the operating system and the standard installed fonts. It is 16 on
Window and 14 on Linux and MacOS X. The default value depends also on
the size / resolution of the screen.
the size of the font used in lists and selectors. The default
size is 12 for low resolution screens and 14 for high resolution
screens.
the size of the font used to display this HTML user manual. The
default value depends on the screen size and resolution (16 on low res
screens, to 18 on high res screens).
the size of the font used to display the labels of the tabs and
the text in the status bar (messages and mode name). The default value
is 14 for low res screens and 16 for high res screens.
the size of the font used in the text fields used in query boxes
and selectors (string search, load file, ...). The default value is 14
for low res screens and 16 for high res screens.
the background colour of the editing window.
the colour of the standard style text
in the editing window.
the background colour of the mono-line textfields (minibuffer).
The file, emoji and special characters popup list uses the value of
this colour to automatically display the text on a light or dark
background.
the colour of the text in the mono-line textfields.
the background colour of all the interface widgets, except main
text and text fields. On Windows the default value is #bad2ea (light blue) which match exactly the
standard window border colour (at least on Windows 7).
the background colour of all the interface widgets, when the
window does not have the keyboard focus. On Windows the default value
is #dbe8f3 (less light blue) which
match exactly the standard window border colour of inactive windows.
the foreground colour for all the interface widgets (buttons,
status line, ...)
the background colour of the active tab. The other tabs are
displayed using the inactive_gui_background
colour.
the colour of the triangle which is displayed at the end of the
lines that crosses the window boundary (long line).
the colour of the ¶ symbol which is displayed at the end of the
folded lines that would have crossed the window boundary (only when
long lines folding is enabled, see the mode specific auto_wrap flag)
colour of the question text in the yes/no dialog boxes.
the colour used to highlight the patterns found by the search commands.
the colour used to highlight the selected portion of text.
the colour used to highlight the default text value in
mono-line text fields. This is used for
example in the search commands to search again the previous
pattern.
the colour used to display the executable file names in the
standard file selector.
the colour used to display the directories names in the standard
file selector.
the colour used to display the plain file names in the standard
file selector.
the colour used to display the names of the files that match a
given suffix filter in the standard file selector.
controls wether the scroll lift is permanently visible (if true)
or progressively displayed (if false) when the mouse pointer
approaches the right side of the window.
the width in pixels of the scroll lift.
the colour of the scroll lift background. If set to #0, the
scroll lift has no background (i.e.: is transparent)
the colour of the (inactive) scroll lift.
the colour of the active scroll lift. When the mouse pointer is
near enough the right border of the window, this colour indicates that
a left-click will scroll one page of the text, or a left-drag inside
the lift will continuously scroll the text.
the colour of the in-motion scroll lift. As long as the scroll
lift is moved by a left-drag, it is displayed with this colour.
Specify the combination of keyboard modifiers that must be
pressed to activate the follow_mouse behaviour of
the insertion cursor. The possible values are: None,
Ctrl, Shift, Alt, Meta or
any combination of them separated by +.
Specify the combination of keyboard modifiers that must be
pressed to drag the current tab to another window, on to create a new
window with it. The possible values are: None,
Ctrl, Shift, Alt, Meta or
any combination of them separated by +.
Specify the combination of Ctrl and / or Shift keyboard modifiers
that must be pressed, while the Meta_L / Meta_M / Alt_L / Alt_R key is
pressed in order to pop the emoji selection
window. The default value is Alt_R on MacOS X and
Ctrl+Alt_R otherwise.
Specify the combination of Ctrl and / or Shift keyboard modifiers
that must be pressed, while the Meta_L / Meta_M / Alt_L / Alt_R key is
pressed in order to pop the special symbol
selection window.
The time interval in milliseconds between two successive clicks
of a mouse multi-click.
The list of the user-defined display styles
names. This is a comma separated list where the spaces (blank or tabs)
are ignored. If the list is too long to be clearly visible, it can be
splitted on several lines using a \ (backslash) just before the end of
line to ignore it.
Style aliases can be defined to reuse the same
style in another context, using an appropriate name. The aliases for a
style are put between parenthesis just after the main style name. (for
more details see text styles in the next section)
Example:
            styles = LineCommentStyle, BlockCommentStyle, \
                     LibraryStyle (CommandStyle, AliasStyle), \
                     KeywordStyle, StringStyle
blockcomment_name [BlockCommentStyle]
[BlockCommentStyle]
These are the names used in the configuration file to denote the
line comment and block comment styles. It is important to FLWiX to
know internally what these styles are, in order to allow the adjust-paragraph command to fold correctly
the lines that contains comments, so that comments remains comments!
The period of time in milliseconds the buffer shape remains
displayed after an action on the mouse wheel.
synopsis: wheel_acceleration = Std Acc
this is the number of lines scrolled in response to an action on
the mouse wheel. The first number is used when no modifier is pressed
(standard scroll speed), and the second number when the Ctrl modifier
is pressed (accelerated scroll speed).
the number of characters inserted or destroyed that will trigger
an automatic backup of the buffer. The backup file has the original
file name followed by a "#".
synopsis: dir_umask = dir1(umask1):dir2(umask2):dir3(umask3)
The octal number may have up to 3 digits: PGO where P stands for the
owner of the file, G users of same group, and O all the other ussers.
Each digit is made of 3 bits: WRX where W stands for deny write access, R
for deny read access and X for deny execution access.
For example the mask value 022 means that the owner of the file will
be granted read and write accesses (and exec right if saved into an
already executable file) but only read access for the other users.
Unfortunately, this is not relevant for the Windows version of FLWiX,
due to operating system restrictions.
The default value (set in the default .flwxrc file) reflects my
personal choice and therefore could be changed to match yours!
synopsis: info_path = dir1(d1):dir2(d2):dir3(d3)
If the delay is 0 no informations about files located in the
corresponding directory will be saved.
As for the dir_umask parameter, the default value
is my personal choice and can be used only as an example.
the period of time (number of days) where the informations about
edited files will be retained when these files are not located
in a directory mentioned in info_path
synopsis:
set list = item1\
           item2\
            ...
           itemN\
           last_item
This is useful to share parts of a specification list (
keywords or alias) between some related
modes. A "$" sign must be put at the beginning of the name of the
variable to get its value:
            alias:  $c-alias\
                    catch      catch (|*) {|+|-}\
                 ...
synopsis: include file
acts as if the file contents replaced the include
line. include directives can be nested.
synopsis:
defcmd new-command () { cmd_1 (); ... cmd_N (); }
defines a new editing user command made of a sequence of
primitive commands. The user commands are available to the
keytable of any modes. A new command definition can also be made
inside a mode definition, but will be nevertheless available for
any mode.
Note: the mark (primitive command "set-the-mark ()"), is local to the
user_command (i.e. the standard mark is saved, then restored when
the user command exits.
synopsis:
defmode [: basemode] { "mode parameters" }
defines (or re-defines) an editing mode. Implicitly, all the modes
derive from the Fundamental mode and then, even if
there is no explicit base mode, they inherit from the
Fundamental mode:
The Fundamental mode can also be redefined and
therefore derives itself from the built-in Fundamental mode.
When redefined, it become the new base mode of all the
modes.
Furthermore, when a mode explicitly derives from
another one, the derived mode inherits:
The "mode parameters" are keyword <==> values
associations, with various formats. They are described in
details in the next section.
Style specific options
When loading a new file in a window, the most appropriate editing
mode is searched to fit the type of the file. There are two
criteria to determine the mode:
In practice, with well chosen priorities and magic patterns, most of the
times (all the times for me!), this algorithm selects the more appropriate
mode.
Otherwise, if the list is not empty (some suffixes
was matched) the list is filtered (pruned) with the magic
patterns. If this filtering leads to clear the list, forget the
magic patterns, just use the suffix list!
Again, if only one
mode remains, this one is chosen. If the list is empty then the
Fundamental mode is chosen.
If all the priorities are the same, the mode with the
greatest number of occurrences of magic patterns is chosen.
Finally, if these numbers are the same, the last mode in the list
is chosen.
The file is read and the number of
misspelled words are computed using the dictionary of each mode of
the list. The mode selected is the one, among those which have
less than 4% of misspelled words, that have the highest priority.
At last, if there is more than 4% of misspelled words, the mode
with the lowest number of misspelled words is chosen, regardless
the priorities.
example in C mode:
magic: };|[ ]char[ ]|^#define|!//
the value is a list of regular expressions that will be
searched in the first 4Kb of the file. If a match is found this
mode will be added to the list of potential modes for this file.
The special character ! indicates that the following regexpr
is NOT to be found in order to consider this mode. In the example,
the !// regexpr is used to discard C++ files from being
edited in C mode.
example:
suffix: *.cc|*.h
the value is a list of regular expressions. If the filename
match one of the regular expressions, this mode will be added to
the list of potential modes for this file.
example: priority: 4
this is a number from 0 (the highest priority) to 9 (the lowest
priority); If not set, the default value is 5, in the middle of
the range. If there is more than one mode in the list of potential
modes, the one with the highest priority is chosen.
synopsis:
          alias:    pattern   expanded\
                    self-expansible
The alias table is a list of couples <pattern,
expanded> or when the pattern is the same string as the
expanded form, only one string (which is self
expansible). The pattern may be either a character string
or a regular expression. the expanded part is a string
where "|" and "\" characters have special meanings.
When the pattern is a string, depending on the global
parameter alias_prefix, the
expand-alias command (bound by default
to $T, the tabulation key) will expand a prefix or the whole
pattern. When the pattern is a regular expression, it is
searched in the portion of the line at the left of the cursor
and replaced as in ed or
sed.
In any case, when the pattern is found, it is removed and
replaced by the expanded string, which may contain:
The bar character must be escaped with a back-slash to
suppress its special meaning. Of course the back-slash
itself must also be escaped!
Here is an example:
          alias:      metabolite\
                      \([-0-9][0-9]*\)\(deg\) \1°\
                      {                       {|+|*|-}
Any prefix of "metabolite" will be expanded to the whole word. The string
"-273deg" will be expanded to "-273°". An opening curly brace will be
expanded to:
          {
              *
          }
where the * is the position of the cursor after the expansion.
To avoid repetitions in modes that share
aliases, such as C, C++, CUDA and JAVA for instance, global variables
can be used to store alias definitions. For example, the
c-alias defined by:
            set c-alias =
                {           {|+|*|-}\
                case        case |*:\
                default:
can be used in the definition of the aliases of the C++ mode with:
            alias:  $c-alias\
                    catch      catch (|*) {|+|-}\
                 ...
Note the '$" used to take the value of the "c-alias" variable.
synopsis:
      keytable:   <key-1> <command-1> [(arguments)] \
                  <key-2> <command-2> [(arguments)] \
                                    ...
                  <key-N> <command-N> [(arguments)]
This table associates keys to
commands. Keys have been described in
section 1.2, and all the commands are
described in detail in chapter 3. Some
commands allow or require arguments. These arguments are
either keywords specific to the command, or numbers, or
strings.
For example:
                  $$R   forward-char (selection)\
                  $R    forward-char\
                  ,     replace-string ("c", "ç", "ç", "c,")\
                  $E-   change-fontsize(-)
Each line except the last one must be terminated by a back-slash. The
built-in Fundamental mode defines the basic keytable
associating keys to all the common commands. Every modes implicitly
derive from the Fundamental mode, or explicitly from another mode
(which derives in fine from the Fundamental mode).
The keytable of a mode is inherited from its base mode and then merged
with the one built from the keytable switch leading to new or
modified key bindings. To add a common behaviour to the editor the
user can redefine the Fundamental mode.
when set to true, a spell check is performed each time a
separator is typed and therefore underline misspelled words.
Moreover, words that are poorly accentuated but where the
accentuation is unambiguous are also underlined, but then,
automatically corrected when the following separator is
typed.
Of course, at least "main_dictionary" must be set to use
the spell checker.
For modes where both "main_dictionary" and "alt_dictionary"
are set, if infer_language is set to true, flwx
automatically chooses the language that generates the fewest
errors (this can be overruled at any time using the language
button in the bottom banner).
This test is made only at load time, in order to set
the initial spell check language. Setting this flag to
false may be useful for the modes where the initial
content of the buffer can mislead the automatic choice of the main
language (for example in Mail modes, the header on a still empty
mail makes the main language set to English).
As for infer_language, when both "main_dictionary"
and "alt_dictionary" are set in a mode, when
language_recheck is set to true, the buffer
language is checked every 15 characters entered. Again,
this can be overruled at any time using the language button in the
bottom banner.
the file name of a dictionary (a list of words, one per line)
used for prefix-expansion (expand-alias)
and for spell check. When using the supplied dictionaries, the
corresponding language flag (spell logo on the bottom banner) is
automatically displayed. Dictionaries can be plain text or
compressed with gzip and sorted or not. When FLWiX loads the
dictionaries, a simple test is performed to determine if they are
already sorted. If not, FLWiX will sort them and write back the
sorted version into the original files. The sorting process can
take up to a quarter of second but is done only once (unless a
dictionary is modified by the user and left unsorted).
Do not use the standard sort command, because
FLWiX uses a specific comparison function that make no difference
between accented and non accented versions of the same characters
in the various spell-check related functions.
the file name of the alternate language dictionary.
the file name of third dictionary which will contain words
explicitly put by the user (add-word-to-dict command). When
expanding a prefix this dictionary is first searched.
comma-separated list of constants selected from:
misspell, mult_spell, accented, alt_lang. The commands
next-underlined-word (^J) and prev-underlined-word ($^J) navigate
to the next / previous misspelled word according to the
jump_type list specified in the current mode.
set the characters that are not part of a word (the space,
tab and line-feed characters are automatically added). This
controls all the word commands (moves, delete, change of case,
...), the alias expansion (the prefix to expand must be a
word), and the recognition and therefore the correct colour
and font used for the keywords.
it is a list of couples [regular expression, type] where the
regular expression defines what character combination delimits a
paragraph and the type specifies the behaviour of the
adjust-paragraph command:
The paragraph beginning is implicitly searched at the
beginning of a line so any leading "^[ \t]*" in the regular
expressions is useless. If two or more regular expressions are
matched, the longer match takes precedence; If the lengths are
the same, then the first match takes precedence.
For example:
    paragraph_delimiters:   "[1-9]*[0-9]*[\.:-] "   par-ind\
                            "---[-=]"               no-par\
                            "----*"                 par-noind
indicates that a dot, a colon or a dash, possibly preceded by a
one or two digits number, and followed by a space, delimits a
paragraph. When the adjust-paragraph command is called, the lines
following this delimiter will begin at the same column as after
the final space of the delimiter (since the maximal length of this
delimiter is 4 characters).
Any line beginning with 4 dashes, or 3 dashes and the equal
sign will not be considered as a paragraph delimiter.
Any line beginning with 3 dashes or more than 4 dashes will
begin a new paragraph, but without any indentation of the next
lines.
if set to true the adjust-paragraph command
will stop the folding of the paragraph if reaching a comment.
Otherwise, the rest of the paragraph beyond the comment will be
also folded.
if set to 0, the adjust-paragraph command (Esc p) folds the
lines longer than the width of the window. Otherwise the long
lines are folded at the specified value.
this is the character encoding used to save the buffer in a
file. The internal character encoding uses one byte per character
and is an extension of IsoLatin-9. The possible values are
iso-8859 and utf8. The "char encoding" icon
on the status bar (bottom of the editing window) reflects the
value of the charset flag. A left click on this icon
toggles the charset. Finally, when a file is read (load-file command ^X^F) the encoding of the
characters in the file is automatically recognised and the icon
set accordingly.
if true, the lines longer than the width of the window are
folded at a space character. The character ¶ is displayed at the
end of every folds of the line to distinguish them from a
real end of line.
The beginning-of-line and end-of-line commands (^A and ^E) moves the
cursor to the beginning and the end of the current fold, and the
beginning-of-folded-line
while the end-of-folded-line
commands ($^A and $^E) moves the cursor to the beginning and the
end of the real line.
if set to true adds a column on the left side of
the window with the line numbers. The toggle-line-numbers command (^X^L)
switches on and off the line numbers display.
adjusts the vertical spacing between lines by a number of
pixels, positive or negative. The default value is 0 on MacOS X, 2
on Windows and -1 on Linux.
if true, the new-line-indent
command indents the newly created line using first tabs then
spaces to go to the right column. Otherwise only spaces are used.
the number of spaces equivalent to a full tabulation.
if true, the Apostrophe character will be converted to
the ASCII single quote character when a file is loaded or text is
pasted from the clipboard or cut=buffer. Otherwise no
conversion will be made.
In order to highlight important parts of the edited text or
inversely to blur unimportant parts (for instance keywords in
LaTex type modes) FLWiX implements display Styles. A style
is a combination of a colour and a font, which can be chosen by
the user (see xxx_colour and xxx_font below).
i) with the keywords
switch, when it is a known word that need to be displayed in a
particular style (like a keyword in a programming language),
ii) or delimited by opening and closing regular
expressions (like a C comment that begins with "/*" and ends with
"*/") when the list of patterns is not known or is too long to
enumerate.
An alias name for a plain style defines alias names for those
configuration switches, built in the same way.
The switch prefix is made by removing the "Style" terminator from
the style name, and by replacing each capital letter with an
underscore followed by the same letter in lower case (except for
the very first letter of the style name). For example
"MyOwnStyle" defines the following 4 configuration switches:
The default ~/.flwxrc configuration file defines 11
styles that are used in the provided edition modes:
The colour used to display text in MyOwnStyle
The font used to display text in MyOwnStyle (see what
is a font descriptor in text_font below).
In modes using MyOwnStyle, when the cursor is inside
a portion of text displayed in that style, the editing mode
is temporarily switched to submode_name.
this switch defines the opening / closing format that will be
used to recognise the text to display in MyOwnStyle, where:
- op_regex, cl_regex : is the regular
expression for the opening (resp. closing) delimiter
- hl_op, hl_cl : booleans; if true, the opening
(resp. closing) pattern will be displayed in MyOwnStyle, otherwise
displayed in StandardStyle
- ck_sp : boolean; if true, the spell checker will test
the spelling of the words displayed using this style.
- nested : boolean; if true, nested sub-styles are
searched inside the text displayed using this style. Usually, in
comment styles, this flag is set to false because a comment can
be made of anything that therefore must not be recognised as
anything else than a comment.
the style used for line comments, for example: // ... in C-like programming languages,
# ... in shell, or % ... in LaTex.
the style used for block comments, for example: /* ... */ in C-like programming
languages, or <!-- ... --> in
HTML.
the style used for class names in programming languages (C++,
Java, ...). A specific syntax is used in the
keywords switch to recognise class names.
the style used for constant names in programming languages.
(#define'd names in C, C++, ...)
the style used for the C-preprocessor directives themselves:
#define, #include, ...
the style used in the CUDA mode for the CUDA-specific
keywords that are not part of C++, such as "__device__",
"<<<", ...
the style used in the programming languages, LaTex, HTML
modes to highlight keywords.
the style used in the programming languages modes for library
functions.
the style used in the text and programming languages modes to
highlight quotes and some kind of constants that are enclosed
between specific delimiters.
the style used in the text and programming languages modes to
highlight strings (text enclosed between specific
delimiters, mainly double quotes ").
the style used in the C-like programming languages modes to
highlight user-defined data types.
Style regexpr
Style font
Style colour
Style submode
argument argument_font argument_colour
block_comment block_comment_font block_comment_colour block_comment_submode
bold bold_font bold_colour
caption caption_font caption_colour
ccode_colour
change_font change_colour
class class_font class_colour
constant constant_font constant_colour
cpp cpp_font cpp_colour
delete_font delete_colour
extension_font extension_colour
insert_font insert_colour
italic italic_font italic_colour
keyword keyword_font keyword_colour
library library_font library_colour
line_comment line_comment_font line_comment_colour line_comment_submode
math math_colour math_submode
no_font no_colour
quote quote_font quote_colour
ref ref_font ref_colour
same_font same_colour
string string_font string_colour string_submode
switch_colour switch_submode
title title_font title_colour
type_font type_colour
typedef_font typedef_colour
value_font value_colour
variable_colour
verbatim verbatim_font verbatim_colour verbatim_submode
The other text styles parameters are:
2.4 Mode list
the font descriptor of the font used for text displayed in
StandardStyle. A font descriptor can be either the name of the
thirteen built-in fonts or one of the eight user-defined fonts.
These can be:
the association table between regular expressions defining
what a keyword is, and the style used to display it. This can
be also used to assign a style to words, because of their
relative location from a keyword:
        keywords:   pattern   pattern_style\
                    pattern   pattern_style other_style <\
                    pattern   pattern_style other_style >\
                    pattern   pattern_style other_style -
These four lines assign the style "pattern_style" to any word
matching "pattern". Furthermore, the three last lines assign
the style "other_style" to all the occurrences of the word
placed before (resp. after, resp. end of line) the word
matching the pattern. For example (from the C++ mode):
:: KeywordStyle ClassStyle <
will display the text "... WixWidget::forward_word ..." with the
ClassStyle for "WixWidget", and KeywordStyle for "::"
(assuming that ':' is NOT in the colour_delimiters
value). Furthermore, the word "WixWidget" will be displayed
in ClassStyle anywhere in the buffer.
struct KeywordStyle TypedefStyle >;
will display the text "... struct
record ..." with the
KeywordStyle for "struct", and TypedefStyle for
"record". Again, all the occurrences of the word "record" will be displayed in
TypedefStyle anywhere in the buffer.
typedef KeywordStyle TypedefStyle -
will display the text "... typedef
unsigned int uint;" with the
KeywordStyle for "typedef", and TypedefStyle
for "uint". All the occurrences of the word "uint" will be displayed in
TypedefStyle anywhere in the buffer. In the real C++
mode, the words "unsigned" and
"int" are displayed
in KeywordStyle because of some other lines in the
association table.
            set c-keywords =
                int         KeywordStyle\
                long        KeywordStyle\
                float       KeywordStyle
can be used in the definition of the keywords list of the C++ mode with:
            keywords:  $c-keywords\
                       class  KeywordStyle\
                 ...
Note the '$" used to take the value of the "c-keywords" variable.
$commands$ CommandStyle\
The syntax of those names is $name$ where:
"Linux", "MacOSX", "Darwin", "Windows", "IsoLatin", "ISO-8859-1",
"UTF-8", "utf8", "FRE", "ENG", "GER", "SPA", "ITA", "POR"
"OS", "OSTYPE", "SYSTEM", "USER", "LOGIN", "USERNAME",
"CHARSET", "LANG", "ROOT", "ADMIN"
suffix:, magic:, line_comment:, library_colour:,
word_delimiters:, colour_delimiters:, ...
fontsize, shape_timeout, highlight_all_found,
wheel_acceleration, list_fontsize, query_fontsize,
case_sensitive, alias_prefix, num_lines, num_columns, ...
exec-user-cmd, backward-search, flasher-parenthesis,
find-opening-par, prev-line, next-line, forward-char,
backward-char, ...
from_alias_table, clipboard, selection, C, +, -
the system command line used by the process-buffer FLWiX command to
process the buffer (compilation, text processing, etc.).
For example:
g++ -O %f -o %b
would do the job for the C++ mode. The most general command would
be 'make' on Linux / MacOSX operating systems.
this is the set of characters that will be used to detect
what a word is, for the only purpose of setting a style to a
pattern.
synopsis:
include_directive: ^#include "\(.*\)"|//[
]*style_import[ ]*"\(.*\)"
The name of the included file is specified
with the \( ... \) regular sub expression. When this
parameter is set, the table that associates styles to words is
initialised by processing all the files included in the first 100
lines of the buffer. This means that the styles found in the
included files are also applied to the current buffer.
For example, in the standard C++ mode, if
header.h is included in the main.cc file,
loaded in the current editing buffer, and if header.h
contains the line:
#define my_sup(x,y) ((x)>=(y) ? (x) : (y))
then all the occurrences of my_sup in the current
buffer will be displayed using the ConstantStyle.
The second regular expression in the
standard C++ mode (the one after the '|') means that a
special comment can be used to explicitly imports words
styles from a file not necessarily included by the C++
preprocessor. This can also be used to circumvent the 100 lines
detection limit.
Note that this behaviour is
recursive: meaning that nested included files are also
processed up to a total of 64 different included files (a file is
never processed twice). Be aware that FLWiX does not know whether
or not an included file will be really included (because of
conditional compilation switches for example).
user_font_2:
[Courier] [Courier]
user_font_3:
[Courier] [Courier]
user_font_4:
[Courier] [Courier]
user_font_5:
[Courier] [Courier]
user_font_6:
[Courier] [Courier]
user_font_7:
[Courier] [Courier]
user_font_8:
[Courier] [Courier]
            user_font_1:       Times New Roman Italic
            linecomment_font:  user_font_1
The line comment font will be Times New Roman Italic in the
considered mode.
user_font_offset_2: [0] [0]
user_font_offset_3: [0] [0]
user_font_offset_4: [0] [0]
user_font_offset_5: [0] [0]
user_font_offset_6: [0] [0]
user_font_offset_8: [0] [0]
            user_font_1:         Times New Roman Italic
            user_font_offset_1:  -2
            linecomment_font:    user_font_1
The height of the font will be shrunk by 2 pixels.
CUDA
Objective-C++
Shell
C-Shell
Python
XML
Text
German
LaTex
Bibtex
MarkDown
Mail
Makefile
SED
PHP
HTML
FLWX
WallChart
Hsim
Lisp
The documentation of the command is displayed on the next line.
3.2 Insertions / Deletions
Move the cursor forward by numarg characters. If this command is passed the selection argument (with the Shift modifier), then the selection is extended to the final position of the cursor.
Move the cursor backwards by numarg characters. If this command is passed the selection argument (with the Shift modifier), then the selection is extended to the final position of the cursor.
Move the cursor forward by numarg words.
Move the cursor to the end of the numarg-th word.
Move the cursor backwards by numarg words.
Move the cursor to the end of the current line.
Move the cursor to the beginning of the current line.
Move the cursor to the end of the last fold of the current line.
Move the cursor to the beginning of the first fold of the current line.
Move the cursor down to the next empty line. If no empty line is found, the cursor is moved to the end of the buffer.
Move up the cursor to the previous empty line. If no empty line is found, the cursor is moved to the beginning of the buffer.
Move the cursor down by numarg lines. If this command is passed the selection argument (with the Shift modifier), then the selection is extended to the final position of the cursor.
Move the cursor up by numarg lines. If this command is passed the selection argument (with the Shift modifier), then the selection is extended to the final position of the cursor.
Move the cursor to the numarg-th line of the buffer. For example to go to the line number 25:
Go up by numarg pages (window height).
Go down by numarg pages (window height).
Move the cursor to the end of the buffer.
Move the cursor to the beginning of the buffer.
Scroll up the current view by numarg lines.
Scroll down the current view by numarg lines.
Mark the current cursor location with the mark.
Interchange the positions of the cursor and the mark, i.e. go to the marked character while remembering the current position.
Mark the current cursor location. There are 8 different marks. The mark #0 is the mark: the one that can be swapped with the current cursor position and that defines the region. The 7 other marks can only be sequentially accessed.
Go to the next previously marked location, including the one marked with the mark.
Find the closing parenthesis matching the next opening parenthesis.
Find the opening parenthesis matching the preceding closing parenthesis.
Find the closing brace matching the next opening brace.
Find the opening brace matching the preceding closing brace.
Find the closing bracket matching the next opening bracket.
Find the opening bracket matching the preceding closing bracket.
If triggered just after a string search, moves the cursor at the end of the next occurrence of the pattern found.
Otherwise, when the spell checker is on, moves the cursor at the end of the next misspelled word, according to the "jump_type" mode parameter.
If triggered just after a string search, moves the cursor at the end of the previous occurrence of the pattern found.
Otherwise, when the spell checker is on, moves the cursor at the end of the previous misspelled word, according to the "jump_type" mode parameter.
3.3 Undo / Redo
Inserts, at the current cursor position, the number of the line as a string. (useful for macro-commands)
When the pop_emoji key is held down, the emoji-selection popup dialog is opened. Each emoji clicked is inserted at the cursor position.
The popup dialog disappears when the pop_emoji key is released.
When the pop_symbol key is held down, the symbol-selection popup dialog is opened. Each symbol clicked is inserted at the cursor position.
The popup dialog disappears when the pop_symbol key is released.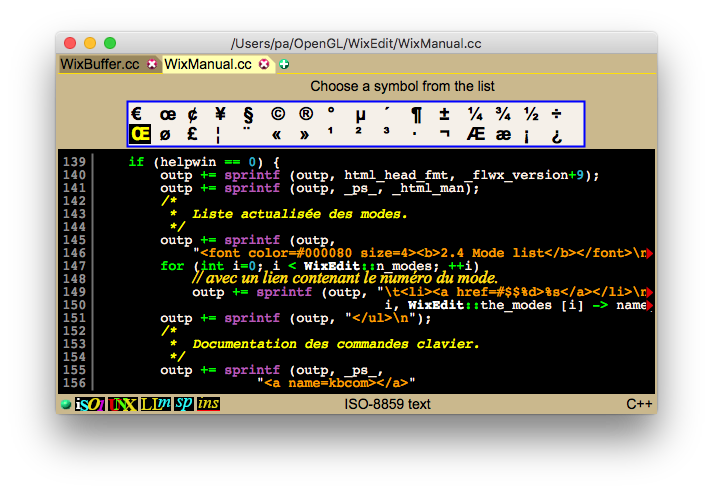
Delete the numarg characters at the right of the cursor. If more than one character is removed, they are saved in the kill-stack
Delete the numarg characters at the left of the cursor. If more than one character is deleted, they are saved in the kill-stack
Remove the end of the current word and the numarg-1 following words, which are saved in the kill-stack.
Remove the current word and the following white spaces. Nothing is saved in the kill-stack.
Remove the beginning of the current word and the numarg-1 preceding words, which are saved in the kill-stack.
Change the initial of the current word from upper case to lower case and vice versa.
Change all the upper case letters between the cursor and the end of the word to lower-case.
Change all the lower case letters between the cursor and the end of the word to upper-case.
Splits a line into two parts (inserts a line-feed character).
Swap the two characters preceding the cursor. This corrects a frequent kind of typo.
Adjusts the current paragraph in order to make it fit inside the space defined by the wrap_column parameter. The lines containing a line-comment are not folded to avoid breaking the comment.
Puts the current paragraph on one, possibly long, line. That is useful, for example, when using cut & paste to fill a form on a website. The lines containing a line-comment are not coalesced with the next ones to avoid extending the comment.
Moves the cursor backward to the opening character (usually a parenthesis or a bracket or a brace) matching the one just typed, then stays there for a while, then returns.
Insert a line-feed character and position the cursor at the correct indentation level on the next line. If this command is passed the C argument, then after an opening curly brace, or a C style keyword (do, for, if, while) one more indentation level is added.
If the + (resp. -) argument is passed, then one indentation level is added (resp. subtracted).
Indents the current line to the correct indentation level and positions the cursor on the first non blank character. This is useful for the C, C++ and JAVA modes.
Inserts a line delimiter (^J or ^M^J on Windows) after the cursor. At the beginning of a line this opens an empty line above.
Replace the current character by the one just typed.
Insert the character as typed.
Inserts explicitely a tabulation character.
Insert the next typed character (unless it is an octal digit) regardless of any special command meaning it may have. If the next typed characters are octal digits, they are interpreted as an octal code, and the corresponding character is inserted.
Erase the current buffer and reset the default filename.
Delete the region: the text between the mark and the current cursor location.
Delete the end of the current line. If called twice in a row, the entire line is deleted and pushed (as a whole) onto the kill-stack. If numarg > 1, then numarg lines are deleted. This is the emacs-like kill-line command.
Delete the end of the current line. If called twice in a row, the '\n' is also deleted and appended to the deleted text in the kill-stack (the next line is joined to the current one). If numarg > 1, then numarg entire lines are deleted and pushed onto the kill-stack.
Delete numarg lines and push them (as a whole) onto the kill-stack.
Delete the beginning of the current line.
Inserts the numarg-th killed item.
Navigate backward in the kill-stack, each time putting back the previously deleted text. For example, if N items have been deleted, "yank-previous" will insert the most recently deleted, then the one deleted before, and so on until the bottom of the kill-stack is reached, or, as in "expand-alias", until another key is hit.
Try to expand the current prefix from i) the alias table of the current mode, then ii) from the words of the buffer itself and finally iii) from the main language dictionary. Each time the ^I (Tab) key is typed (in the standard key maps), the next alias (or word) matching the prefix is inserted in the buffer. This process cycles through all the possible expansions (including no expansion at all, only the initial prefix); At any time, one can escape this cycle by typing any other key than ^I, leaving the buffer as it is displayed.
When the character at the left of the cursor matches one character on the argument string, it is replaced by the following character of the argument string. For example with this key map:
keytable: ' replace-char (eééeEÉÉE)
When the character string at the left of the cursor matches the first of a pair of arguments, it is replaced by the last string of that pair of arguments. For example with this key map:
keytable: ' replace-string ("touche","touché", "ete","été")
Opens the font-selection dialog. The desired font name can be picked up with the mouse or a prefix can be entered with the keyboard (not case-sensitive). The selected font name will be inserted in the buffer (useful in the FLWX mode)
Opens the colour selector. When a colour is selected, its RGB components are inserted in the buffer using the colour format: #rrggbb. See the Colour selection paragraph at the end of section 1.5.
Copy the current selection to the clipboard (on Windows and MacOSX) or to the X cut buffer (on Linux).
Inserts into the buffer the content of the clipboard (on Windows and MacOSX) or of the X cut buffer (on Linux).
Copy the buffer content to the clipboard (on Windows and MacOSX) or to the X cut buffer (on Linux).
Increases (if passed the argument +) or decreases (if passed the argument -) the level of indentation of the region (extended to entire lines).
3.4 Files
Undoes the preceding command.
Almost all the commands are undoable, even loading or saving a file, and closing a window/tab! Undoing write-file means deleting the file if it was non-existent, otherwise re-writing its previous content (the same for undoing save-same-file). When the file is updated, its access and modification time stamps are also updated.
Redoes the previous undone command.
Redoing write-file or save-same-file simply means creating the file if it is non-existent, and writing the current content of the buffer.
Undoes the preceding command made in a diff window. As the diff window shows two correlated panes, they share the same undo buffer. This means that the undo command is global to the two panes and undoes the preceding modification whatever the pane it has been made from. The apply-line-change command can modify simultaneously the two panes. In this case one undo command undoes simulatneously the changes made in each pane.
Redoes the previous undone command made in a diff window. As the diff window shows two correlated panes, they share the same undo buffer. This means that the redo command is global to the two panes and redoes the preceding undone modification whatever the pane it has been made from. The apply-line-change command can modify simultaneously the two panes. In this case one redo command redoes simulatneously the changes made in each pane.
Show the undo history.
3.5 Search / Replace
Load the file prompted for in the file selector. If the command is passed 4 as numeric argument, the file is loaded verbatim, meaning none of the process described below is applied. This is used to load (binary) files strictly as they are on the disk. In this case the octal display is forced, even if useless, and the Fundamental mode is used. if the is neither compressed nor crypted, if it is compressed, if it is crypted, or if both. The crypt key is queried once per session. The set-crypt-key command allows the user to set/reset the crypt key at any time. The decryption algorithm (AES256 or DES) is selected according to the magic number stored in the loaded file.
Reload the current file. No confirmation is asked when the current buffer is modified (this command is undoable).
Load the file prompted for in the previously loaded files history list. The position and size of the window are set as when this file was previously loaded. This command is disabled when there is more than one tab in the window.
Load the file prompted for in the file selector in a new tab.
Insert the file prompted for in the file selector.
Searches the regular expression, prompted for in the query dialog box, into all the files of the current directory, whose name match the suffixes declared in the current mode. Each file containing the regular expression is loaded into a new tab (if it is not already loaded). The cursor is put at the beginning of the line that contains the first occurrence of the regular expression.
Save the buffer the file prompted for in the file selector. The new filename becomes the current filename for this editing window. The file will be saved as it is if the icon is shown on the status bar. It will be compressed if the icon displays , crypted if the icon displays , or compressed then crypted if the icon display . If the file is to be crypted a crypt key is queried, if not already set before in the same session. The encryption algorithm (AES256 or DES) is selected using the aes_crypt global switch.
Save the buffer in the current file. The modification time of the file is compared to the time when the file was loaded. If they do not match, the file may have been modified by another programme while being edited. As this could lead to data loss, the user is asked to confirm.
Save the current user defined macro command into the prompted file.
Load the macro command from the prompted file.
Translate the buffer to PDF then save it into the file prompted for in the file selector.
Translate the buffer to PDF then launch the user preferred PDF viewer to see it.
3.6 Windows / Tabs
Search forward for a character string in an incremental way: each change made to the pattern (insertion or deletion) triggers a new search from the position in the buffer where the search command was issued. The ^N or Down Arrow (^P or Up Arrow) keys search for the next (previous) occurrence of the pattern.
If the searched string is the character ø (0340) the next (previous) non-ascii character (code > 0200) is searched.
Search backward for the previous occurrence of the character string prompted for.
If the searched string is the character ø (0340) the previous non-ascii character (code > 0200) is searched.
Search forward for the next occurrence of the regulal expression prompted for.
Search backward for the previous occurrence of the regular expression prompted for.
Search forward for the next emoji in the buffer.
Search backward for the previous emoji in the buffer.
Replace conditionally each occurrence of a character string (or a regular expression) by another one. The search (and replacement) is made starting from the current cursor position. Each time the string is found it is highlighted and the user can:
When the last change is done, only two options remains: undo or exit.
If the regexpr argument is passed to the command, regular expressions are searched and replaced.
Search forward for the character string beginning with the last character of the key. This allows the user to have all the unbound keys of a map reached from a prefix, to be bound to the search command. Bound to ^S in the Fundamental mode, this allows the user to search for a string with "^Sstring" (instead of "^S^Sstring").
3.7 Miscellaneous
Closes (destroys) the current window.
Restores a previously closed window or tab. The window is selected from a list displaying the name of the last file edited.
The window is restored in the same state as when being closed, including its undo/redo history.
Creates a new editing window.
Switches between the standard and alternate window sizes.
If numarg is 1, the window is resized such that the widest displayed line is entirely visible, but no more. The window is resized to not less than 16 columns, and no more than the width of the screen, and might be moved to stay inside the screen. If numarg is 4, the window size is reset to the standard width. If numarg is 16, the window size is reset to the standard width and height. Values greater than 16 resize the window to numarg columns.
Splits the window in two panes, editing the same buffer. This allows the user to look at a region of the buffer while editing another one. If the regions overlap, the modifications made in one pane are visible inside the other one.
Moves the keyboard focus from one pane of a splitted window to the other pane.
Moves the current tab to a new separate window. Does nothing if the current window has only one tab.
Moves the selected window (prompted from the list of all but the current window) into a new tab inside the current editing window. Does nothing if the selected window has already more than one tab.
Creates a new tab inside the current editing window.
Selects the next tab of the current editing window. Nothing is done when there is only one or no tab.
Selects the previous tab of the current editing window. Nothing is done when there is only one or no tab.
Opens the window-selection dialog. To switch to the desired window select its name with the mouse or type a prefix with the keyboard.
3.8 User commands
Makes a snapshot of the FLWiX windows, then terminates the flwx server (destroying all the editing windows).
Makes a snapshot of the FLWiX windows, then re-exec the flwx server to re-interpret the startup file.
Asks for the name of the project directory, then creates a new tab containing the list of the file names of this directory. The user updates this list, removing the names of the files that are not relevent for the project, then save it into the pre-named file. When everything is allright, the create-repository command will use this file to create the repository.
Creates a repository from the _flist_ file. The base directory of the project is the one containing the file list.The first question asked is whether the master repository is to be set on the local or on a remote machine. If remote, the machine name is asked in the minibuffer. The master_host configuration option value is set as the fallback name of the remote host. If the master repository is said to reside on the local macine, then the name of the directory where it will be stored is asked. Wherever it is located, the master repository will contain the informations on the copy command (cp or scp) along with the machine or directory where it resides. Put in other words each project can have its master repository on a specific machine or local directory.
Add a new file to the current repository.
Removes a file from the current repository.
Creates a new version of the project. The modified files are placed in the repository directory along with the diff scripts of the previous version for the text files. For the binary files, the new version is appended to the previous ones. If not on the master host the master repository is also updated.
A combination of check-in followed by get-project-version for the latest version.
Update (or create) the local repository from the master repository. If the local repository already exists, it is updated from the master repository.
If there is no local repository, the first question asked is whether the master repository is local or remote. If remote, the machine name is asked in the minibuffer. The master_host configuration option value is proposed as the fallback name of the remote host. If the master repository is said to be local, then it is the name of the directory where it is that is asked.
This is the command to use to set up a local repository on a new machine for an already existing project where its repository resides elsewhere.
Prompts for a version number to retrieve from the current repository. The last version is proposed by default; The local files are updated unless they are more recent than those from the repository. The user can either remove them and re-update, or commit to a new version.
Show a window with the content of two files side by side. Initially the two panes have the same size, the vertical delimiter can be dragged to change their width. A diff algorithm is performed to compare the left file to the right one.
The line-comparison algorithms use a very fast hashcode based comparison function that flags identical lines in a matter of nanoseconds; When lines differs only because whitespaces another hash function is used to flag them in again a few nanoseconds; Finally a simple linear comparison algorithm is used to flag similar lines in less than a hundred nanoseconds). This allows really resembling lines to be treated as equal by the diff algorithm. Four types of differences are reported:
These colours are the default values for four styles: ChangeStyle, InsertStyle, DeleteStyle, and SameStyle. These styles must be aliases for the four first declared styles. The Diff mode can be redefined in the configuration file (it is in the default flwxrc). Notice that it is the only mode that do not derive from the Fundamental mode.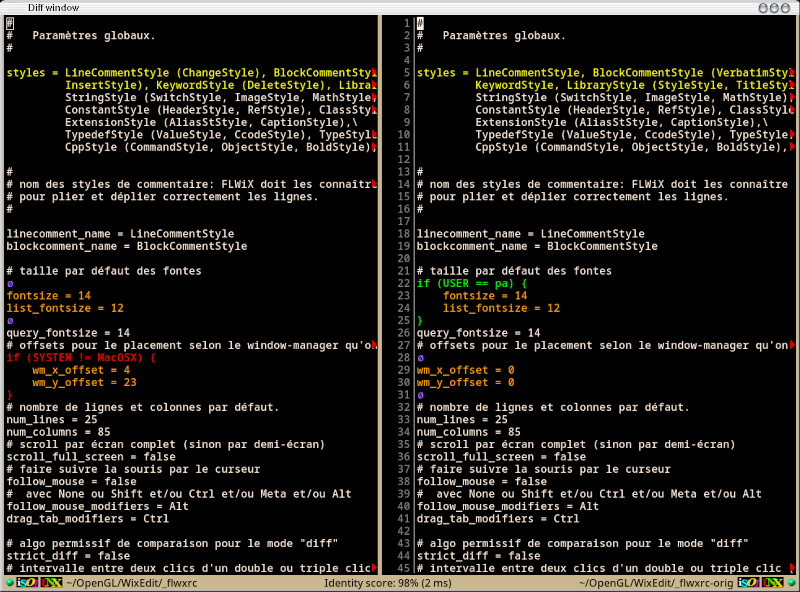
Go to the next difference in the diff window.
Go to the previous difference in the diff window.
Apply the change for the current line...
Redo a diff between the two buffers of the diff window.
Toggle the focus between the two panes of the diff window.
Set to numarg the number of spaces represented by a tab on display. If numarg is 1, it is reset to the default value.
Set or reset the key used to cipher / decipher the files read or written.
Infers the edition mode from the content of the current buffer.
If the current mode has a value for the process_command parameter, the buffer is saved, then the filename (resp. basename) is substituted to the %f (resp. %b) part of the process_command, and the command is applied. The standard input is redirected to /dev/zero, the standard error and standard output are redirected to /dev/null. The command is ran in the directory containing the file to process.
Displays the current line number and the total number of lines of the buffer in the status line.
Displays in the status line the number of words of either the selection or the region.
Repeat the previously executed command.
Begins to learn a new keyboard macro.
Ends the collection of the current macro.
Execute the last defined macro command.
Launch the user-command whose name is specified in the argument.
Scroll the window to display the current line at the center of the window. If called with numarg == 4, the current line is moved at the top of the window. If numarg == 16, the current line is displayed at the bottom of the window. Otherwise the current line is placed at the numarg_th vertical position.
Copy the top of the the kill-stack to the clipboard.
Copy the end of the current line into the kill-stack. If the clipboard argument is passed, the end of line is also copied into the clipboard.
Copy the region (the text between the mark and the cursor) to the kill-stack. If the clipboard argument is passed the region is also copied to the clipboard.
Remove the numarg last items from the top of the kill stack.
Allows the user to enter a numeric argument.
Opens the mode-selection dialog. The desired editing mode can be picked up with the mouse or a prefix of its name can be entered with the keyboard (not case-sensitive)
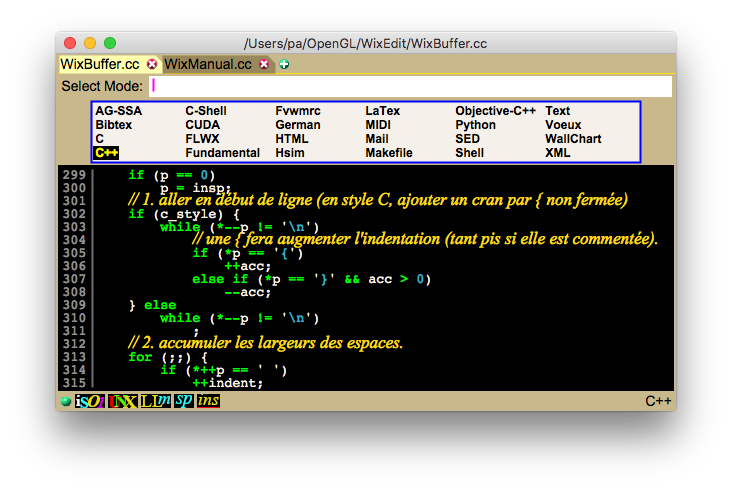
Clears the modified state of the buffer; the modified flag in the status bar become green.
Toggle the display of the non ascii characters between font glyph and binary (octal) representations.
Pops up the full documentation window. The documentation can be saved in HTML into ~/.FLWiX.html.
Pop up the list of all the command names. The documentation of the chosen one is popped up in the same kind of window as with explain-key.
Wait for the user to enter a key, then pop up a window on top of the current editing window. This window shows the documentation of the command which is bound to the entered key in the current mode.
If the current mode has a main dictionary, and/or a personal dictionary, the current word is searched in these dictionaries. If the word is correctly spelled nothing happens. If the word exists with other spellings that differ only by accented characters then a menu pops up to select a possible variant. Moreover some common typos are checked: letters inversion, one bad letter, one missing letter, one letter too many, etc.
If there is only one correct spelling the erroneous word is automatically replaced by the correct one. Otherwise a menu pops up to select a replacement word. The menu is sorted with the least accented words on top. The user can navigate only using the keyboard:
When the word is correct but variants exists only because of accented letters, the global switch accented_variants_only indicates wether or not only these variants are displayed, or if the full search of spellings must be performed.
If there is a main dictionary defined for the current mode, all the words of the buffer are searched in this dictionary. The misspelled, bad-accented, and alternate language words are underlined accordingly.
Turns on and off the check spelling. When turned on, the automatic language discovery is turned off, conversely, when turned off, the automatic language discovery is turned on.
Cycle among {no check spelling, use main dictionary, use alternate dictionary} if they exist in the current mode or in a submode.
Add to the personal dictionary the word where the text cursor is located.
Bound to all the keys that are not bound to a command (free keys). This command can be used to invalidate unwanted inherited keys bindings.
Show/Hide the line numbers on the left side of the window
Called with the + (resp. -) argument, this command increases (resp. decreases) the size of fonts used in this window.
Switches on or off the automatic discovery of the editing mode when loading a file. If switched off, the window will remain in Fundamental mode regardless the type of the loaded file.
Enters or quits the submode where any character typed replaces those of the current word, then inserts them after the end of the word. Any other command than self-insert quits this submode.
Swaps the main editing mode: replace vs insert.
Toggle the modifiable / non-modifiable buffer status of the current window of tab.
Toggle the text character set of the buffer between ISO_LATIN-9 and UTF-8. The subsequent write or save command will write the file using the selected character set.
Toggle the long lines / wrapped lines display mode of the current window of tab.
Cycle among {plain, gzipped, encrypted, gzipped+encrypted} buffer. The subsequent write or save command will compress and/or encrypt the buffer before writing it to the file.
Inserts an empty line before the current one.
Surrounds the current word with the LaTeX boldface directive: wor|d -> \textbf {|word} the cursor is then put at the beginning of the word.
Website designed & maintained by Patrick Amar (patrick DOT amar AT lri DOT fr)
[ last: 25/01/2026] 3820 hits since 09/01/2020