
Programming of Interactive Systems (Intro)
Anastasia Bezerianos
Lectures web site
Eclipse is an IDE (Integrated Development Environment) tailored for writing programs in Java. If you haven't done it yet, install it. Below are some useful menu items in Eclipse that you should consider using:
Edit > Show Tooltip Description: toggle the display of the tooltip containing documentation about the element on which the carret is pointing at.Source > Organize Imports: automatically adds all the missing imports.Source > Format: nicely reformats your source code.Source > Generate Element Comment: inserts a javadoc block comment for the element on which the carret is pointing at.Also, the shortcut ctrl+space gives you an auto-complete menu.
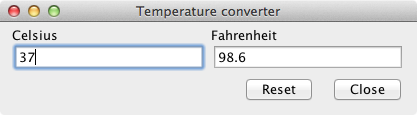
The aim of this exercise is to create a temperature converter containing:
init() in the file TempConverter.java by using the class JPanel and layout managers of your choice to make the resulting window look like the pictured above.
textFieldCListener reads a floating value in the Celsius text box when the user press "enter", convert it from Celsius to Fahrenheit, and write the result in the Fahrenheit text box. Associate this listener to the text box of the Celsius value.textFieldFListener in order to do the conversion from Fahrenheit to Celsius. Associate it with the text box of the Fahrenheit value. buttonCloseListener closes the window. Associate it to the close button.buttonResetListener in order to empty both text boxes. Associate it to the reset button.enter. Use a KeyListener (that you attach with JTextField.addKeyListener) instead of an ActionListener. The KeyListener will be notified at each key press.the following exercise was originally made by Nicolas Roussel and is translated here in english.
The aim of this third exercise is to build a file chooser similar to the one pictured below:
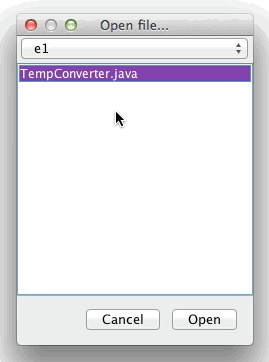
The scrollable list in the middle of the window shows the content of the current folder; sub-folder names are followed by a slash (/). The pop-up menu at the top contains a list of all parent folders of the current folder.
FileSelector.java file by using the classes JComboBox, JList, JScrollPane and JButton to build the dialog box pictured above. Make sure that the location of the widgets remains consistent when resizing the window.Cancel button or the Open button while a file is selected closes the dialog box.Open button on a selected folder updates both the scroll list and the pop-up menu.Open button.Note that Swing provides a class, JFileChooser, that allows to easily choose a file or a folder.
Apart from 2bis the following exercises are originally made by Nicolas Roussel and are translated here in english.
The aim of this second exercise is to build a color chooser which enables users to:
The current color is previewed in a rectangular area. The whole window looks like this:
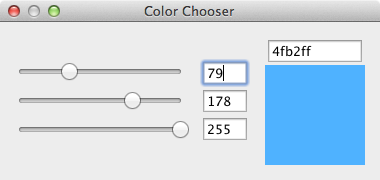
The code of the color chooser should be decomposed in 3 parts using the MVC model. The goal of this model is to separate the internal data from the way to display these data to users and the way to enable users to interact with these data. If you don't know what the MVC model is, ask your TA for explanation!
init() in the ColorChooser.java file by using the class JPanel to make the resulting window look like the one pictured above. It's the View of the MVC model.ActionListener or a KeyListener for the JTextField, use a DocumentListener that you can attach this way: JTextField.getDocument().addDocumentListener. What do you observe?You can use the methods Color.getRGB, Integer.toHexString and String.substring to convert a color into an hexvalue and the method Color.decode to do the conversion in reverse.
The aim of this exercise is to build a percentage viewer similar to the one pictured below using a MVC design pattern:
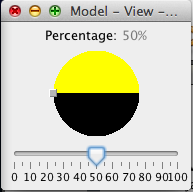
PercentageLabel, PercentagePieChart and PercentageSlider ) to the main class ( Application.java ) in order to have the same picture as above.Percentage_Controller.java to make the link between the Model and the views (See TODO in the code).PercentageLabel and PercentageSlider - see TODO in the code).Note that Swing provides a class, JColorChooser, that allows to easily choose a color.
The aim of this exercise is to build a drawing application in order to get familiar with 2D drawing:
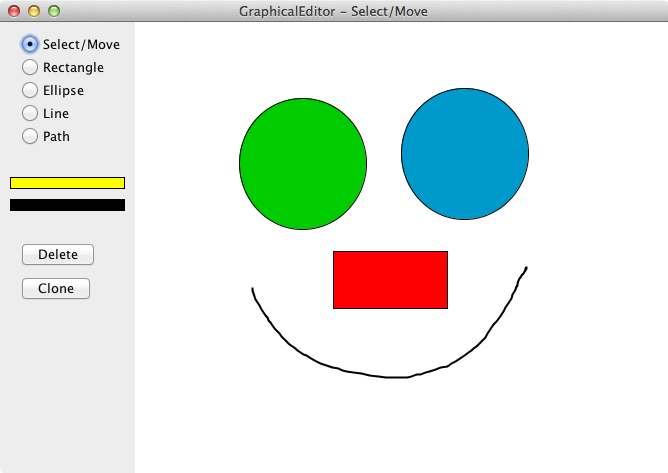
GraphicalEditor.java is the graphical interface.PersistentCanvas.java is a persistent canvas which stores the created items.CanvasItem.java is the abstraction of one item of the canvas.RectangleItem.java is the rectangle item class (inherited from the abstract class CanvasItem.java.GraphicalEditor class to enable mode selection: when the user clicks on a radio button, it should change the mode and update the window title accordingly.GraphicalEditor class to enable shape selection: when the "Select/Move" mode is active, when the user clicks on the canvas, the shape directly under the cursor should be selected. You will also have to implement the PersistentCanvas.getItemAt(Point p) method that handles the picking of a shape at a location p on the 2D canvas. Delete and Clone buttons so that the user can delete or clone (and translate a bit) the selected shape.MouseMotionListener in the GraphicalEditor class to let users move shapes in the canvas.EllipseItem, LineItem and PathItem classes. They should support the same features: move, delete, color change, etc. For the path, you can use the class java.awt.geom.GeneralPath.
It is recommended to check the documentation about Shape.